How to install a new hard drive in your desktop PC
Installing an internal hard drive is one of the more straightforward upgrades out there—and is often a better option than using external drives that are slower and may be dropped or misplaced.
The process usually requires no more than mounting it, connecting a couple of cables, and formatting the drive for use. Still, there are a few things you should know to make installation as smooth as possible.
Drive cages, bays and mounting options
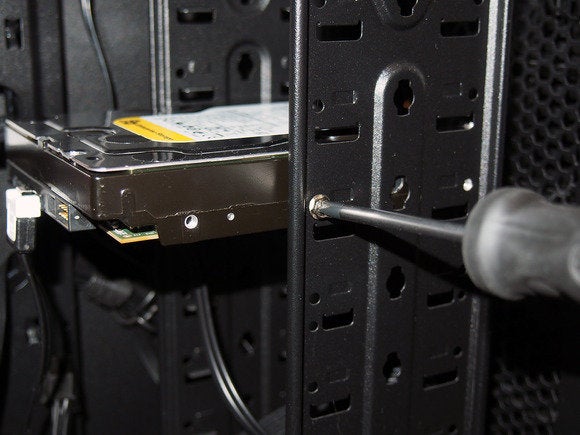
Internal 3.5-inch hard disk drives are typically mounted in a drive cage or in an available drive bay. Placement and orientation of the cages or bays will vary from case to case. The most common location is at the lower front, near the intake fans and away from other components. Drive cages/bays will most often be mounted perpendicular to the bottom of the chassis, while drives mounted in the cages usually sit parallel to the bottom of the case.
 Marco Chiappetta
 Screws are the best way to secure your hard drive into your case’s drive cage. Magnet-tipped screw drivers can help keep you from dropping screws in difficult-to-reach places.
In mainstream cases, drive connectors will typically point to the rear. In enthusiast-class cases, it’s becoming more common to see the drive’s connectors facing the right side, making it easier to route and hide cables behind the motherboard tray. Some enthusiast-class also cases give users the ability to remove drive cages or to mount them in different positions to optimize air flow and simplify cable management.
Mounting your hard drive
Physically mounting the hard drive in a PC is probably the most difficult part of the installation process.
Securing the drive to a cage usually requires four screws on the sides or bottom of the drive. Many cases—especially enthusiast cases—use tool-less trays that hold the drives with simple pins and clips.
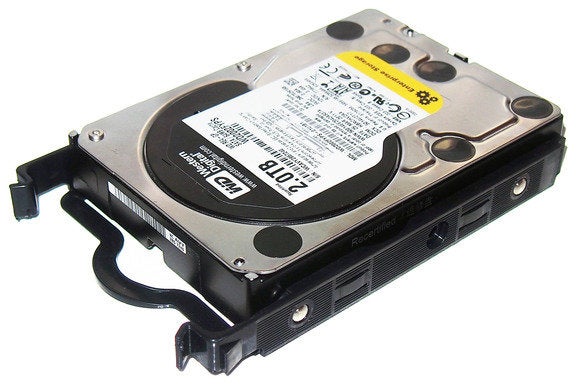
Some cases come with tool-less brackets that make mounting hard drives really easy. However, these brackets are often less secure than traditional screws.
Using screws is the more robust mounting method, but tool-less trays are fine for systems that won’t be moved around much.
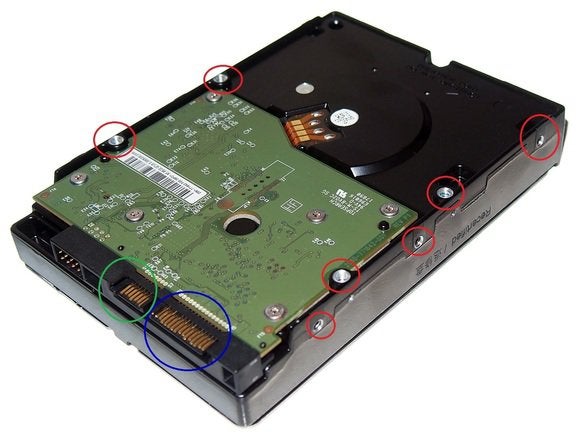
This hard drive is flipped upside-down to show its parts. Seven of the 10 screw holes are circled in red, while SATA power and data connections are circled in blue and green, respectively.
Drives last longer when they stay nice and cool. When mounting drives in a system, try to leave as much space between them as possible to maximize airflow over the tops and bottoms. Positioning the drives directly in front of an intake fan also helps.
Connect the hard drives with SATA
Once the drive is mounted, connecting it to your system is quick and easy.
Virtually all new desktop hard drives sold today use the SATA interface (unless you’re dealing with servers). SATA uses simple cables that are keyed to fit on the drive and motherboard connector one way.
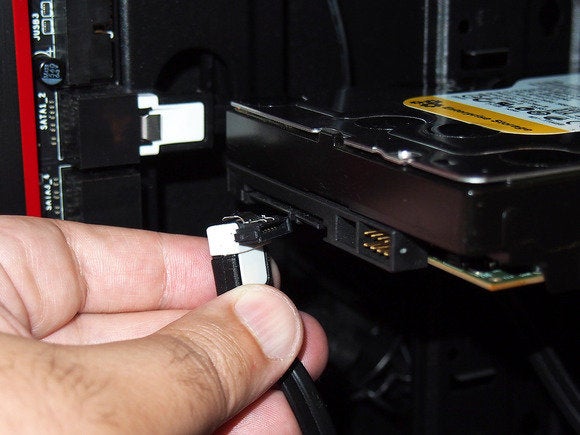
Connect one end of the SATA cable to the drive, and the other end to an available SATA port on your motherboard, and you’re halfway there.
 Marco Chiappetta
 Some SATA data cables come with L-shaped ends, which can help keep cables tidy.
You may find the SATA cables included with your new drive or motherboard feature different connectors: straight ends or right-angle (L-shaped). Some may have metal retention clips, while others do not. The shape of the connector makes no difference in performance.
I like to use SATA cables with right-angle connectors on the drive side, provided there is adequate clearance between any drives in the system. Using right-angle connectors on the motherboard side will will result in blocked ports, because the connector may overlap adjacent ports.
Try to find SATA cables with metal retention clips, because they help keep the connectors secured. Newer SATA 3 (6-gigabit)-compliant cables will usually come with the clips, but older SATA 2 (3-gigabit) cables do not.
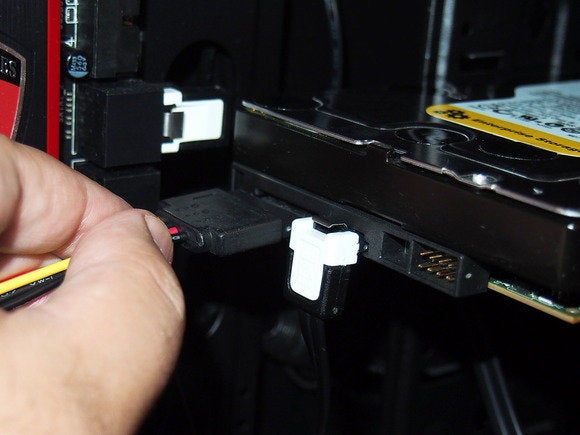 Marco Chiappetta
 The SATA power cable connection looks similar to the data cable, but is longer. The connector is keyed to fit only one way.
When you’re done connecting the SATA cable, you’ll have to connect the drive to your power supply unit (PSU). The SATA power cable from your PSU, like the SATA data cable, is keyed to fit onto the drive one-way. As long as you don’t force it, there’s really no way to mess it up.
Prepare the hard drive for use
Once you’ve mounted and connected the drive, power up your system and enter the BIOS/UEFI. You can usually access the BIOS/UEFI by pressing the DEL or F2 keys right after powering up the system. Usually, your system will display a message along the lines of “Press DEL to enter Setup.” Consult your motherboard’s manual for the correct key.
In the BIOS, go to the standard System Settings menu or the Integrated Peripherals > SATA menu to see all of the drives installed in the system. If all of your drive controllers are enabled and the drive is properly connected (and functional), it should be listed in the BIOS.
If the drive isn’t listed, shut down your PC. Double-check all of the connections, boot into the BIOS and check again. If the drive still isn’t showing up and all the connections are secure, try plugging the SATA data cable into a different port on the motherboard.
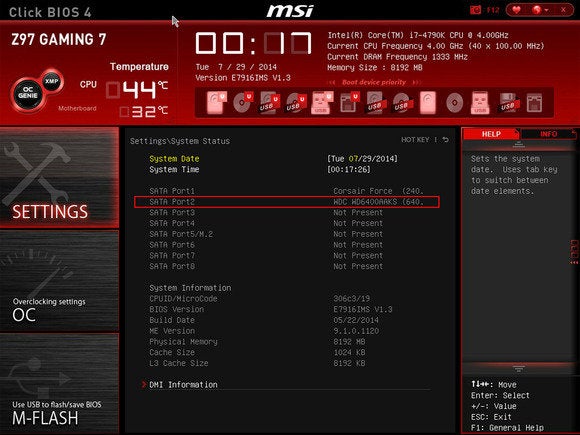
The UEFI BIOS will show all hard drives that are connected correctly and detected by the system. BIOS and UEFI interfaces can differ based on the motherboard make and model, so check your motherboard manual or manufacturer website for details.
To confirm that Windows recognizes the drive, open up Device Manager. In Windows 8, right-click the Windows button on your desktop and select Device Manager. Check for the drive in the Disk Drives section.
When you boot into Windows after installing the drive, you may see the New Hardware Found wizard pop up if the drive is detected.
The last thing you need to do is partition and format the drive.
And with that, the drive should be available for use. If you split the drive up into multiple partitions, you should see several drives appear in File Explorer, each with its own drive letter and label.


